
The combination of DroneViewer and drones makes for a powerful duo. With DroneViewer you can see exactly where your drone was on a Google Map at the time of video capture. You can GeoTag key points in your video to mark their positions on the Map and return to those points at any time. The GeoTags also display the line-of-sight (LOS) distance from the tag to the current drone position. This can be used to show your distance from the operator, as shown below:

GeoTags, shown in the Map and in GeoTags list on right, show key points of interest and distances to the UAV. In this case the tags represent the locations of the two oil rigs, Emma and Eva, which are not shown in Google Maps. The graph in the bottom-left shows the UAV speed versus time. The lower-mid Dashboard display shows the speed distance, heading, position, and number of GNSS satellites in view. The LOS distance of the drone from the operator was 1.5 miles at this point in the video.
You can then export your GeoTags to an Excel file for review and analysis. Below is another example showing DroneViewer used for post-flight examination of drone video.

DroneViewer being used to survey an oil field for leaks. The video was captured using a GoPro Hero 3 Pro mounted to a DJI Phantom 2. The GPS data was recorded using a FlyTrex Core 2.
Currently DroneViewer can accept GPS data from drone footage in four forms: DJI’s SRT file (Mavic Pro, Mavic Pro 2, Phantom 3,4), Autel EVO, GPX file, and FlyTrex Core 2 file. These methods are described below:
Run DroneViewer and load your drone’s movie files through the File menu or through the Open Folder, or Open Files toolbar button. DroneViewer will look for GPX, SRT (DJI), ASS (Autel) and Flytrex CSV data files in the movie file directory. In order for DroneViewer to associate the movies with the correct data files, the data files must have the same base name as the movie files. For example, DroneViewer would expect to find the file DJI_0007.GPX, DJI_0007.SRT or DJI_0007.CSV if the movie DJI_0007.MP4 was loaded.
DroneViewer will begin playing the first movie in the folder or in the list of movies that was selected. By default files are loaded according to file modification date (this can be changed to name ordering in the Preferences). When DroneViewer reaches the end of the movie it will jump to the next movie in the list and continue playing. It will do this until all movies have been played.
If your DJI drone is controlled by the DJI Go App or DJI Fly App, then you can easily import your flight trajectory into DroneViewer via the SRT file. Before your flight, be sure you turn on the Video Caption option in the Go or Fly App camera settings.
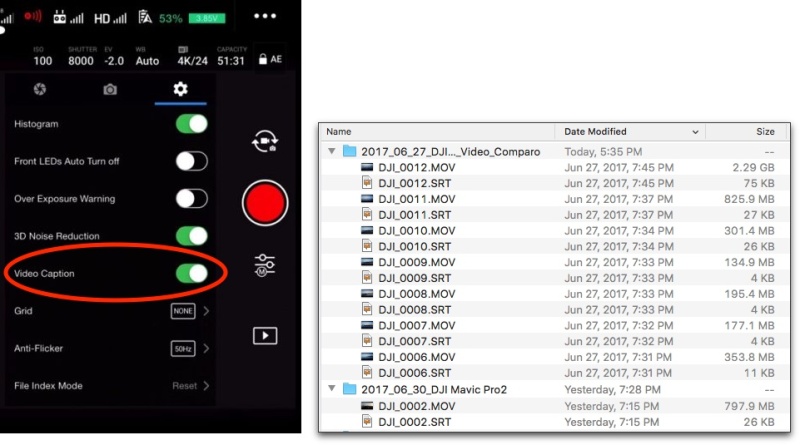
Turn on Video Caption in your DJI Go App settings to have your UAV create SRT files alongside your movie files

In the DJI Fly App, be sure to turn on Video Subtitles. Also, choose H.264 video encoding because H.265 (HEVC) is not supported on all devices at this time.
This will make the drone create an SRT file for each movie. The SRT file contains the flight trajectory information. Make sure the SRT file is in the same directory as your movie and has the same root name. Drag one of your movies into the DroneViewer window or select Open Movie File from the File menu. DroneViewer will process the data and you’ll see your drone’s flight path and current position as the movie plays. The speed and number of satellites-in-view are also shown in the Graphs.
A few caveats when working with SRT files:
If you have an Autel Evo and use the Autel Explorer App , then you can easily import your flight trajectory into DroneViewer via the ASS file. Before your flight, be sure you turn on the Subtitle .ass Files option in the Explorer App camera settings.

Turn on “Subtitle .ass Files” in your Autel Explorer App settings to have your UAV create ASS files alongside your movie files
This will make the drone create an ASS file for each movie. The ASS file contains the flight trajectory information. Make sure the ASS file is in the same directory as your movie and has the same root name.
Drag one of your videos into the DroneViewer window or select Open Movie File from the File menu. DroneViewer will process the data and you’ll see your drone’s flight path and current position as the movie plays. The speed, distance, and altitude are also shown in the Graphs.
A few caveats when working with ASS files:
GPX is an XML-based navigational data exchange format consisting of tracks and waypoints. An example of a very short GPX file is shown below. This sample has one track consisting of 2 waypoints:
<?xml version="1.0" encoding="UTF-8" standalone="yes"?>

<gpx xmlns="http://www.topografix.com/GPX/1/0" version="1.0" creator="DroneViewer Pro">
       <metadata>
              <name>Sample GPX</name>
       </metadata>
       <trk>
              <name>Track Start Time: 2018-01-15T00:28:00Z</name>
              <trkseg>
                      <trkpt lat="33.6673000" lon="-118.0274000">
                             <ele>22.1</ele>
                             <time>2018-01-15T00:30:56Z</time>
                             <speed>15.5</speed>
                      </trkpt>
                      <trkpt lat="33.6674000" lon="-118.0273000">
                             <ele>22.0</ele>
                             <time>2018-01-15T00:30:57Z</time>
                             <speed>15.2</speed>
                      </trkpt>
              </trkseg>
       </trk>
</gpx>
To load a GPX file into DroneViewer, you must give it a filename with the same base name as the movie it is associated with. For example, to load GPX data for a movie named DJI_0007.MOV, you must name the GPX file DJI_0007.GPX.
If there is a timing bias between the movie and the GPX file, you can compensate for this by adjusting the Time Offset in the Preferences after loading the movie/GPX file. If you make a change to the Time Offset, be sure to de-select the Always Auto-Fix Time Offset checkbox or the offset will be forgotten when the second time the movie is played.

If manually adjusting the timeline, de-select Always Auto-Fix Time Offset.
An easier way to make the Time Offset adjustment is to use the “,” and “.” keys in the Graph window. These keys will adjust the Time Offset by -1 or +1 seconds. For coarser adjustments, the “m” and “/” keys will move the Time Offset by -10 and +10 seconds.

Adjust timeline using ‘m’, comma, period, and ‘/’ keys when the Graph view is selected. Use keypoints in the video and map to help with precise alignment.
When you are happy with the synchronization, click the Save Settings button, which looks like a disk icon in the Main window. The icon will turn green to indicate the settings, including the synchronization, have been saved.
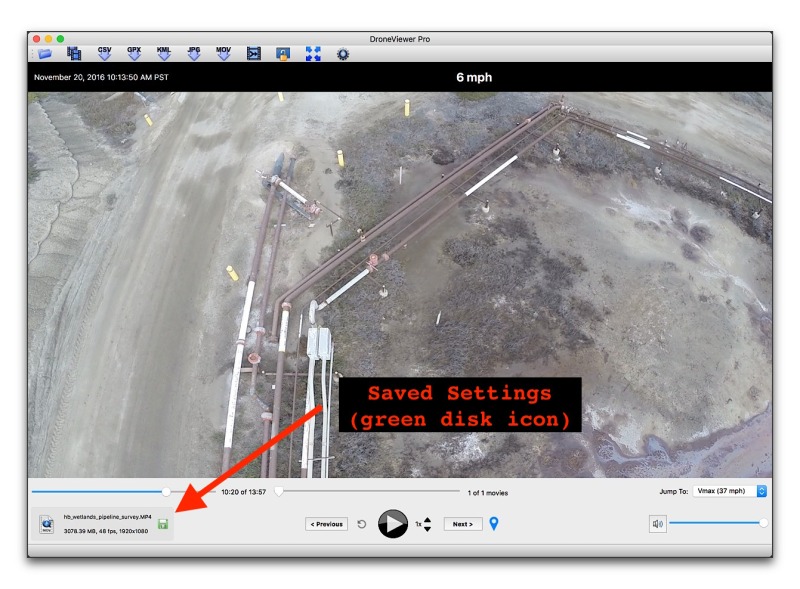
Saving the timeline settings
A settings file will be created in the same directory as the movie file. This file is automatically loaded every time you load this movie. If you’re not happy with the synchronization, click the disk icon again to delete the settings file. Then you can try again.
FlyTrex provides simple add-on logger that records your drone’s flight data to a microSD card. The Core 2 is compatible with many drones but I have only tested this method with the DJI Phantom 2.

